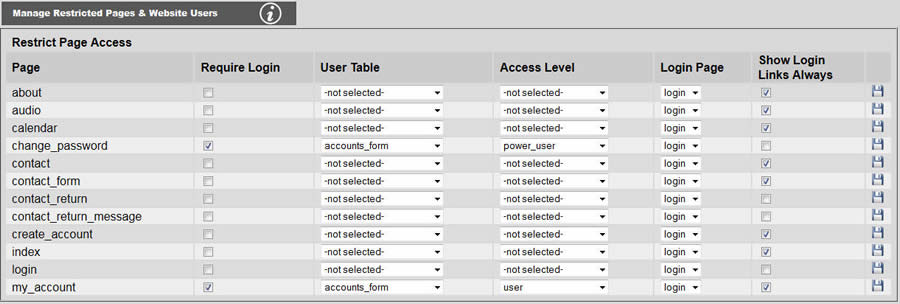
This management console provides the ability to require login for any page that you have on your website. This system is completely independent from the Breeze Website Builder, and is intended to dispense content in a controlled manner to website users in combination with account creation forms, login forms and password change forms as described in Forms for Login Required Pages. You may also use this console to setup multiple calendars or events grids, or personalized calendars or events grids possibly requiring login as describe in Events Grids or Calendars.
The above console is used to set which pages will require login, and who will be able to log into those pages. Unless the Require Login checkbox is checked, the page will be open to the public. The User Table column specifies which table contains the users that may log in to any particular page. This table is typically created automatically when somebody uses the Account Creation Form, and has the login fields appended through the Add User Login Fields to Table tool shown below. If this is the only field specified for a particular page, then all users and any access level will be granted access to that page.
The Access Level column provides a way to grant access to a group of users (in addition to having different groups in different tables which is also effective). If both the User Table and the Access Level fields are specified for a particular page, then access is granted only to those users in that table that have the specified user level. If only the Access Level is specified, then only users of that access level from ANY table can log into that page. Note: There really is no inherent hierarchy with different access levels as there is in this Breeze Website Builder, i.e. admin has no special domain of user. Each access level is merely a "user group". In fact, it is probably a good idea to delete the stock access levels and cerate your own.
Login Page specifies which login form to use to gain access to any particular page. Login pages are created using the Login Form plugin. Any page that has the string "login" anywhere in its name will be considered a login page by this system and will appear in the dropdown list (regardless of whether or not the login form plugin was used, so do not use "login" in your page names UNLESS you are using the login form plugin. This feature is provided such that you may add different verbiage and styling to login forms used on different areas of your website.
Checking Show Login Links Always will display the modal Create Account --- Login <====> My Account --- Logout menu block on the page regardless. Upon updating any mail form style, the default styles will be created to position this modal menu block at the top right of your page. You may further customize the position and other styles as you wish using the style sheet editor for Mail Form Styles.

The above console is used to approve users for access to your restricted pages. Select a table from the Table list to show the users in that table as shown below:

A user account will not work until a site manager checks the Active checkbox and clicks the save button. Clicking the save icon will also automatically send a message to your customer/associate if an HTML Welcome Message Page has been assigned to your user table. See below for how to assign an HTML welcome message page. Clicking the edit icon will populate the Modify User area with the users info including fields not normally included in that area others. For more information, see below.

The console shown above adds the necessary login fields to the table you have chosen to use for your users. Your user table will not work until you use this tool, and at this time there is no warning if you have not done this, so please remember to add the user login fields to your user table. Select your user table from the Table list and click Add User Login Fields to Table. Running this tool twice on the same table will not cause any harm.
You may also want to assign a page to use for your HTML message that gets sent to your customer/associates when you activate their account. To do this, select your user table from the Table list, select the page from the Message Page list and click Assign Welcome Message Page to User Table. Any page that has the string "message" anywhere in its name will appear in the in the message page list. You will need to create such a page first before it is available. There is also an HTML Message Page Welcome plugin that provides a "boiler plate" which you can modify for your purposes. It includes the place-holder strings [FIRST_NAME], [LAST_NAME], [USER_ID], and [PASSWORD] which are replaced on the fly before sending the message with the appropriate values for that user when that user's account is activated.

The above console allows you to create and delete your own access levels. Note: These access levels have nothing to do with the access levels used by the Breeze Website Builder. Thing of them simply as "user groups".

The above console is provided as a backoffice method to manage users. Note: Typically, users will be created using the account creation form, and password changes will be handled with the password change form. This console gives you a way to help your customers create or delete accounts, or change passwords. It is also possible that you don't need to provide an account creation form on your website and you may prefer to add your users manually. This is one way to avoid accounts being created with trivial passwords.
If you click the edit icon next to a user listed in the Approve Access to Users section, the Modify User area will populate akin to below:

Note that additional fields become available for editing. This feature is designed to adapt to whatever fields are in the user table being used which are determined by the form for creating the account in the first place.